]]>
]]>
Introducing the Chain Links Tool Set
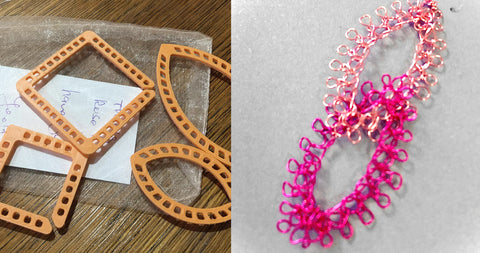
For those unfamiliar with this tool set, let me introduce you to its magic. The Chain Links Tool Set consists of two leaf-shaped looms in different sizes, two square-shaped looms, and a circular loom. Each shape is designed not only for its aesthetic qualities but also for its functional ingenuity. What sets these looms apart is that they enable creating interlocking designs. Thanks to a unique opening in each shape, you can connect the forms to one another, building complex designs that are visually dynamic.
This ability to interlock forms opens up endless possibilities. Whether you want to create a statement necklace, a multi-layered bracelet, or even an intricate wall hanging, the flexibility of the set lets your imagination run wild.


The Creative Process: From Looms to Masterpieces
I’ve taught countless workshops, both online and in person, where these tools take center stage. What always amazes me is the diversity of outcomes. Each participant brings their own style, vision, and flair, transforming these simple shapes into something completely unique. I’ve had students craft delicate jewelry pieces that look like they belong in an art gallery, while others create bold, chunky designs that make a statement all their own.
One of the things I love most about teaching is watching someone start with a basic framework and evolve it into a finished piece that’s a reflection of their personality. The Chain Links set, with its simple yet versatile design, serves as the perfect foundation for this kind of creative freedom.
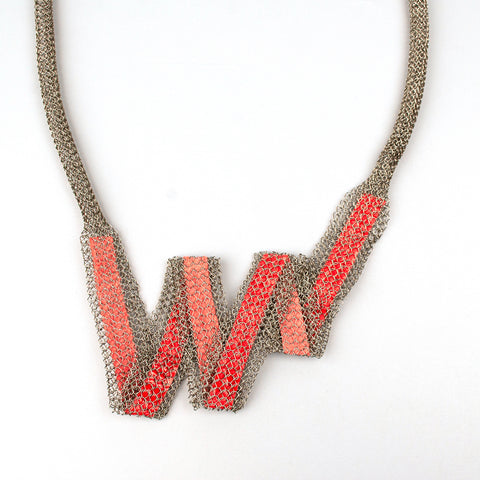
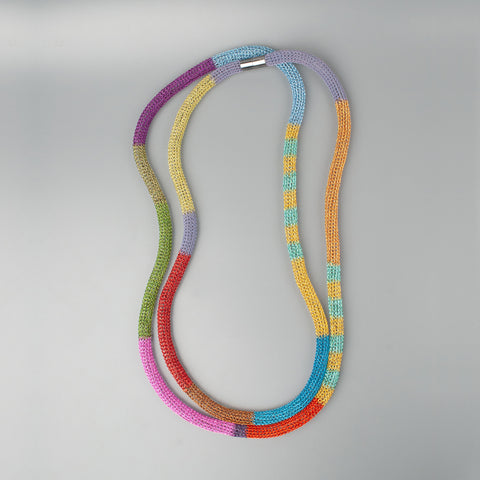
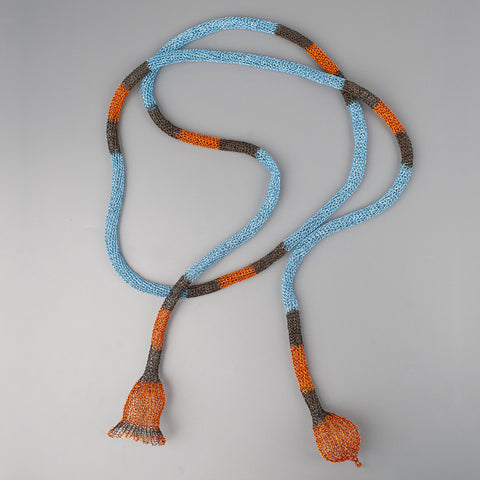
I gathered in here a collection of works made by my class participants, and the results are nothing short of breathtaking. Some have used the leaf shapes to create flowing, organic designs, while others have explored more geometric patterns using the squares and circles. The way these looms allow for experimentation with color, texture, and form is something I find endlessly inspiring. It’s a testament to the power of collaboration—when you give people the right tools, their creativity knows no bounds.


Why Teaching Fuels My Creativity
Teaching, whether online or in person, has been one of the most rewarding experiences for me. Not only does it allow me to share my knowledge and passion with others, but it also fuels my own creativity. Every time I run a workshop, I come away with fresh ideas. Watching how others interpret and use the Chain Links Tool Set among others sets gives me a new perspective on my own designs.
It’s this back-and-forth exchange of ideas that keeps me motivated to push boundaries in my work. When I see someone in my class use the looms in a way I hadn’t thought of before, it sparks something in me. Suddenly, I’m filled with the urge to go back to the drawing board and experiment with new shapes, materials, and techniques.
This collaborative spirit is at the heart of what I do. It’s why I love teaching, and it’s why I’m so passionate about creating tools like the Chain Links set that empower others to explore their own creativity.


The Chain Links Set: A Tool for Every Skill Level
One of the things I appreciate most about the Chain Links Tool Set is its accessibility. It’s perfect for beginners who are just dipping their toes into the world of loom weaving, but it also has enough depth for experienced makers to explore more complex designs. I’ve had students who were completely new to this kind of crafting, and within a few hours, they were creating stunning pieces that they could wear or display proudly.
On the other hand, I’ve also worked with seasoned artists who’ve taken these tools and pushed them to their limits, creating intricate, multi-layered designs that are truly one-of-a-kind. This versatility makes the Chain Links set a fantastic addition to any maker’s toolkit, no matter their skill level.


Looking Forward: New Designs and Inspirations
As I continue to teach and collaborate with others, I’m constantly inspired to create new designs and develop new tools that push the boundaries of what’s possible. The Chain Links Tool Set is just one example of how a simple idea can spark countless creative possibilities. Seeing the incredible work my students have done with these tools has motivated me to explore even more ways to innovate and bring fresh ideas to the table.
I’m already working on new designs that build on the concept of interlocking shapes, and I can’t wait to share them with you all. Whether you’re an established artist or just getting started, I hope these tools and the amazing works they’ve inspired can serve as a reminder that creativity is limitless—you just need the right tools to unlock it.
In the meantime, keep an eye on my newsletter and social channels for more wire crochet tools and design. I promise you, it will leave you brimming with inspiration!
Love,
Yoola
~~~~~~~~~~~~~
Landed here by chance and want to get starting learning wire crochet in the ISK technique?
Click here to learn how to get started
]]>
For the first time, I’ve designed 3D printed bangle blanks that are combined with wire-crocheted tubes to create bangles that blend the best of both techniques. These bangles aren’t just accessories; they’re a new kind of jewelry that marries traditional handcraft with cutting-edge technology. It’s a step into the future of fashion while honoring the time-honored skills of the past.


The Birth of the Chunky Bangles
The idea for these bangles started as an experiment. I’ve always loved making bangles, but I wanted to create something that had a more solid structure than what wire crochet alone could offer. That’s when it hit me—why not use 3D printing to create a framework that could support the delicate wire crochet, giving it both strength and a new aesthetic dimension? After several prototypes and lots of trial and error, I finally landed on a design that I was thrilled with: chunky bangle bracelets that are bold, modern, and eye-catching.
These chunky bangles feature thick, 3D-printed blanks that provide a strong, sturdy base for the wire-crocheted tubes that wrap around them. The result is a piece of jewelry that’s both substantial and elegant, with the intricate wire crochet offering a beautiful contrast to the smooth, sleek surface of the 3D-printed base. The blanks enhance the wire crochet, giving it a sense of weight and presence that it wouldn’t have on its own. It’s the perfect fusion of form and function—jewelry that’s as beautiful as it is wearable.

Listening to the Community: The Thinner Version
When I introduced the chunky bangles, the response was overwhelmingly positive. But, as with any creative endeavor, I knew there was room for evolution. My community’s feedback has always been a crucial part of my creative process, and this project was no different. I heard from many of you that while you loved the chunky bangles, you’d also love to see a thinner version—something a bit more understated that could be worn every day, or easily stacked with other pieces.
So, I got to work on a thinner version of the bangle, one that retains all the qualities that made the chunky version special, but with a slimmer profile. The thinner bangles offer the same combination of 3D-printed blanks and wire crochet but in a more delicate form. They’re perfect for those who prefer a more subtle look, or who want to mix and match with the chunky bangles for a layered effect. Whether you wear them solo or stacked in your favorite color combo, these bangles offer endless possibilities for personal expression.


Color Options and Future Possibilities
Currently, I’m offering the bangles in classic black and white, two colors that complement the sleek, modern design of the pieces. Black and white are timeless, versatile colors that can be easily paired with any outfit, making these bangles a perfect addition to any jewelry collection. However, I’m always open to exploring new color options based on your feedback. If there’s a color you’re dying to see, let me know! I’m excited to experiment with different hues and perhaps even offer custom color combinations in the future.


TLV Museum of Art Gift Shop: A New Home for the Bangles
I’m thrilled to announce that the first collection of these bangles is on its way to the TLV Museum of Art gift shop. Having my work featured in such a prestigious location is an incredible honor, and I’m excited to see how the public responds to these pieces. The museum’s gift shop is known for curating unique, high-quality items, and I hope these bangles resonate with visitors as much as they have with my community.
DIY and How to Wear Them
For those of you who love to DIY, I’ve created a brand-new instructional video that walks you through the process of making your own bangles. Whether you’re a seasoned wire-crochet artist or a complete beginner, this video will guide you step by step, making it easy to create your own unique pieces. And for those who might be unsure about how to wear these bangles, the video also includes tips on styling them.
One important note: these bangles are slip-on and don’t have a clasp or opening mechanism. They do have a bit of flexibility, so they can fit over your hand, but once they’re on, they’re meant to stay in place. This design choice was intentional, as it enhances the bangle’s sleek, uninterrupted form, but it’s something to keep in mind when considering fit.
Looking Ahead: More Designs on the Horizon
This is just the beginning. I’m already working on new bangle designs and other jewelry pieces that will complement these bangles. I’m excited to continue exploring the possibilities that this combination of 3D printing and wire crochet offers.
Thank you for being a part of this journey. Your feedback, support, and enthusiasm are what drive me to keep creating, experimenting, and pushing the boundaries of what’s possible. Stay tuned for more updates, and as always, happy creating!
for easy shopping here are direct links !
~~~~~~~~~~~
Landed here by Chance and want to get started wire crocheting in the ISK technique ? Click here to get started
]]>